1.1初识Mybatis框架
1.1.1 概念
mybatis是一个java编写的持久层orm框架(对象映射框架),以sql语句得到对象,使用ORM实现结果集封装。
1.1.2 使用Mybatis
- 创建maven工程并导入坐标
- 创建实体类和Mapper的接口
- 创建mybatis的主配置文件
1
2
3
4
5
6
7
8
9
10
11
12
13
14
15
16
17
18
19
20
21
22
23
| <configuration>
<!--配置环境-->
<environments default="mysql">
<!--配置Mysql的环境-->
<environment id="mysql">
<!--配置事务的类型-->
<transactionManager type="JDBC"></transactionManager>
<!--配置数据源(连接池)-->
<dataSource type="POOLED">
<!--配置连接数据库的四个基本信息-->
<property name="driver" value="com.mysql.jdbc.Driver" />
<property name="url" value="jdbc:mysql://localhost:3306/db1" />
<property name="username" value="root" />
<property name="password" value="root" />
</dataSource>
</environment>
</environments>
<mappers>
<mapper resource="Mybatis/IuserMapper.xml" />
</mappers>
</configuration>
|
- 创建映射配置文件
1
2
3
4
5
| <mapper namespace="com.Mapper.IUserMapper" >
<select id="findAll" resultType="com.Pojo.User" >
select * from usr
</select>
</mapper>
|
typeAliases类型别名是为java类型设置一个短的名字,存在的意义仅在于用来减少类完全限定名的冗余。java内置内建类型别名它们都不区分大小写,注意对基本类型名称重复采用的特殊命名风格。
1
2
3
| <typeAliases>
<typeAlias type="com.Pojo.User" alias="user"/>
</typeAliases>
|
默认别名为小写
1
2
3
| <typeAliases>
<package name="com.Pojo.User"/>
</typeAliases>
|
1
2
3
4
5
6
7
| <dataSource type="POOLED">
<!--配置连接数据库的四个基本信息-->
<property name="driver" value="com.mysql.jdbc.Driver" />
<property name="url" value="jdbc:mysql://localhost:3306/db1" />
<property name="username" value="root" />
<property name="password" value="root" />
</dataSource>
|
POOLED方式
采用传统的javax.sql.DataSource规范中的连接池,mybatis中有针对规范的实现
UNPOOLED 方式
采用传统的获取连接的方式,虽然也实现javax.sql.DataSource接口,但是并没有使用连接池技术
mappers 属性
1
2
3
| <mappers>
<mapper resource="com/ferao/mapper/UserMapper.xml"/>
</mappers>
|
1
2
3
4
| <mappers>
<mapper class="com.ferao.mapper.UserMapper" />
</mappers>
|
1
2
3
| <mappers>
<package name="com.ferao.mapper"></package>
</mappers>
|
*** PS:***扫描包进行注入绑定方式,接口和它的Mapper配置文件必须同名且接口和它的Mapper配置文件必须在同一个包下
mybatis映射文件
parameterType(输入类型)
可输入的类型有三种:简单类型、pojo对象、pojo包装对象
1)简单类型
2)pojo对象
mybaits使用OGNL表达式解析对象字段的值,#{}或者${}括号中的值为pojo属性名称
resultType(输出类型)
可输出的类型有四种:返回一般数据类型(单条)、JavaBean 类型(单条)、List类型(多条)、Map类型
resultMap(映射实体类)
数据库字段名和实体类属性不相同时,无法映射到值,输出为Null。这是因为mybatis会根据这些从数据库中查询到的列名,将列名转化为小写(数据库不区分大小写)去对应实体类中查询相应列名的set方法设值,由于找不到setUserName(),所以会返回Null值。
1
2
3
4
5
6
7
8
9
10
11
12
13
14
15
16
17
18
| <!--column不做限制,可以为任意表的字段,而property须为type 定义的pojo属性-->
<resultMap id="" type="">
<!--设置主键时使用,使用此标签配置映射关系(可能不止一个) -->
<id column="" jdbcType="" property="" />
<result column="" jdbcType="" property=""/>
<association property="" javaType="">
<id column="" jdbcType="" property=""/>
<result column="" jdbcType="" property=""/>
</association>
<!-- 集合中的property须为oftype定义的pojo对象的属性-->
<collection property="pojo的集合属性" ofType="集合中的pojo对象">
<id column="集合中pojo对象对应的表的主键字段" jdbcType="字段类型" property="集合中pojo对象的主键属性" />
<result column="可以为任意表的字段" jdbcType="字段类型" property="集合中的pojo对象的属性" />
</collection>
</resultMap>
|
mybatis动态SQL
动态sql根据不同的条件生成不同的sql语句.所谓的动态sql,本质还是sql语句,只是开发者可以在sql层面,去执行一个逻辑代码。
1
2
3
4
5
6
7
8
9
10
11
12
| <!-- where 元素只会在至少有一个子元素的条件返回sql子句的情况下,才去插入"where" 子句-->
<select id="queryUser" parameterType="map" resultType="user">
select * from usr
<where>
<if test="id != null" >
id =#{id}
</if>
<if test="username != null" >
and username = #{username}
</if>
</where>
</select>
|
- choose,when,otherwise标签语句示例:
1
2
3
4
5
6
7
8
9
10
11
12
13
14
15
16
17
18
19
20
| <!--
有时不想应用到所有的条件语句,而只想从中择其一项,针对这种情况,Mybatis提供了choose元素
它有点像java中的switch语句
-->
<select id="queryUser" parameterType="map" resultType="user">
select * from usr
<where>
<choose>
<when test="id != null" >
id =#{id}
</when>
<when test="username != null" >
and username = #{username}
</when>
<otherwise>
and id= 4
</otherwise>
</choose>
</where>
</select>
|
1
2
3
4
5
6
7
8
9
10
11
12
13
| <!--
这里set元素会动态前置set关键字,同时也会删除掉无关的逗号
因为用了条件语句之后很可能就会生成的sql后面留下这些逗号,通常与if标签一起使用
-->
<update id="updateUsr" parameterType="map">
update usr
<set>
<if test="username !=null">
username =#{username}
</if>
</set>
where id = #{id}
</update>
|
1
2
3
4
5
6
7
8
9
10
11
12
13
14
15
16
17
18
19
20
21
22
23
24
25
26
27
28
29
30
31
32
33
| <!--
collection 表示迭代集合的名称,可以使用@Param注解指定,如下图所示 该参数为必选
item 表示本次迭代获取的元素,若collection为List、Set或者数组,则表示其中的元素;
若collection为map,则代表key-value的value,该参数为必选
open 表示该语句以什么开始,最常用的是左括弧’(’,注意:mybatis会将该字符拼接到整体的sql语句之前,并且只拼接一次,该参数为可选项
close 表示该语句以什么结束,最常用的是右括弧’)’,注意:mybatis会将该字符拼接到整体的sql语句之后,该参数为可选项
separator mybatis会在每次迭代后给sql语句append上separator属性指定的字符,该参数为可选项
index 在list、Set和数组中,index表示当前迭代的位置,在map中,index代指是元素的key,该参数是可选项。
-->
<!--
第一步:迭代集合,获取对应的item,和外部的(),拼接形成('zhangsan')
第二步:在之前的基础上拼接上逗号分隔符('zhangsan'),
第三步:继续迭代并拼接逗号 ('zhangsan'),('lisi'),
第四步:继续迭代并拼接逗号 ('zhangsan'),('lisi'),('wangwu')
-->
<foreach collection="list" item="item" separator=",">
(#{item})
</foreach>
<!--
第一步:拼接open指定的开始字符 (
第二步:迭代集合,拼接对应的item, ('zhangsan'
第三步:拼接separator指定的分隔符 ('zhangsan',
第四步:迭代集合,拼接对应的item, ('zhangsan','lisi'
第五步:拼接separator指定的分隔符('zhangsan','lisi',
第六步:拼接close指定的闭合字符 ('zhangsan','lisi','wangwu')
-->
<foreach collection="list" item="item" open="(" separator="," close=")">
#{item}
</foreach>
|
1
2
3
4
5
6
7
8
9
10
11
12
| <!-- 这是dao/mapper中的方法
List<MyFile> selectById(@Param("abc") List<String> list);-->
<select id="selectById" resultMap="BaseResultMap" parameterType="String">
SELECT *
FROM file
where id in
<foreach collection="abc" item="item" index="index" separator="," open="(" close =")">
#{item}
</foreach>
</select>
|
1
2
3
4
5
6
7
8
9
| -含义
定义常量及作用于引用
-场景
当多种类型的查询语句的查询字段或者查询条件形同时,可以将其定义为常量,方便调用。
为求<select>标签结构清晰,也可将sql语句分解
|
例子
1
2
3
4
| <!-- 查询字段 -->
<sql id="Base_Column_List">
ID,MAJOR,BIRTHDAY,AGE,NAME,HOBBY
</sql>
|
1
2
3
4
5
6
| <!-- 查询所有,不分页 -->
<select id="selectAll" resultMap="BaseResultMap">
SELECT
<include refid="Base_Column_List" />
FROM student
</select>
|
导入坐标
1
2
3
4
5
| <dependency>
<groupId>com.github.pagehelper</groupId>
<artifactId>pagehelper</artifactId>
<version>5.1.4</version>
</dependency>
|
mybatis-config.xml中配置拦截器插件
1
2
3
4
5
| <plugins>
<plugin interceptor="com.github.pagehelper.PageHelper">
<property name="dialect" value="mysql"/>
</plugin>
</plugins>
|
***ps:***5.x后为PageHelperInterceptor,之前为PageHelper
1
2
3
4
5
6
7
| <plugins>
<!--5.x使用PageInterceptor-->
<plugin interceptor="com.github.pagehelper.PageInterceptor">
<property name="helperDialect" value="mysql"/>
<property name="reasonable" value="true"/>
</plugin>
</plugins>
|
使用方法
1
2
| PageHelper.startPage(pageNum,pageSize);
PageInfo<User> page=new PageInfo<>(结果集);
|
***ps:***只有紧跟在PageHelper.startPage方法后的第一个Mybatis的查询(Select)方法会被分页
- 可调用的API
- getTotal():获取总数量
- getList().size():当前查询记录
- getPageNum():获取当前页码
- getPageSize():每页显示数量
- getPages:总页数
1.1.3逆向工程
MyBatis Generator(简称MBG),如果实际开发中数据库的表特别多,那么我们需要手动去写每一张表的po类,xxxMapper.xml,xxxMapper.java文件,这显然需要花费巨大的精力,而且可能由于表字段太多,写错了而不知道也是可能的。
插件使用流程如下:
- 添加maven依赖
1
2
3
4
5
| <dependency>
<groupId>org.mybatis.generator</groupId>
<artifactId>mybatis-generator-core</artifactId>
<version>1.3.7</version>
</dependency>
|
- 新增generatorConfig.xml文件
a.连接数据库的配置,包括数据名称,数据库用户名密码等配置
b.指定要生成代码的包名,包括实体类po的包名,mapper的包名等
c.指定数据库中哪些表需要生成文件
1
2
3
4
5
6
7
8
9
10
11
12
13
14
15
16
17
18
19
20
21
22
23
24
25
26
27
28
29
30
31
32
33
34
35
36
37
38
39
40
41
42
43
44
45
46
47
48
49
50
51
52
53
54
55
56
57
58
59
60
61
62
63
64
65
66
67
68
69
70
71
72
73
74
75
76
77
78
79
80
81
82
| <?xml version="1.0" encoding="UTF-8"?>
<!DOCTYPE generatorConfiguration PUBLIC "-//mybatis.org//DTD MyBatis Generator Configuration 1.0//EN" "http://mybatis.org/dtd/mybatis-generator-config_1_0.dtd">
<generatorConfiguration>
<context id="msqlTables" targetRuntime="MyBatis3">
<property name="javaFileEncoding" value="UTF-8"/>
<property name="javaFormatter" value="org.mybatis.generator.api.dom.DefaultJavaFormatter"/>
<property name="xmlFormatter" value="org.mybatis.generator.api.dom.DefaultXmlFormatter"/>
<plugin type="org.mybatis.generator.plugins.SerializablePlugin"></plugin>
<plugin type="org.mybatis.generator.plugins.RenameExampleClassPlugin">
<property name="searchString" value="Example$"/>
<property name="replaceString" value="Criteria"/>
</plugin>
<commentGenerator>
<property name="suppressAllComments" value="true"/>
<property name="suppressDate" value="true"/>
</commentGenerator>
<jdbcConnection connectionURL="jdbc:mysql://localhost:3306/db1?useUnicode=true&characterEncoding=UTF-8&autoReconnect=true"
driverClass="com.mysql.jdbc.Driver" password="root" userId="root" >
<property name="nullCatalogMeansCurrent" value="true"/>
<property name="useInformationSchema" value="true"/>
<property name="remarks" value="true"/>
</jdbcConnection>
<javaTypeResolver type="org.mybatis.generator.internal.types.JavaTypeResolverDefaultImpl">
<property name="forceBigDecimals" value="true" />
</javaTypeResolver>
<javaModelGenerator targetPackage="com.unfair.db.model" targetProject="src/main/java">
<property name="constructorBased" value="false"/>
<property name="enableSubPackages" value="false"/>
<property name="trimStrings" value="true" />
</javaModelGenerator>
<sqlMapGenerator targetPackage="com.unfair.db.mapper" targetProject="src/main/java">
<property name="enableSubPackages" value="false"/>
</sqlMapGenerator>
<javaClientGenerator type="XMLMAPPER" targetPackage="com.unfair.db.dao" targetProject="src/main/java">
<property name="enableSubPackages" value="false"/>
</javaClientGenerator>
<table tableName="usr" domainObjectName="User"
enableCountByExample="true"
enableUpdateByExample="true"
enableDeleteByExample="true"
enableSelectByExample="true"
selectByExampleQueryId="true" >
<property name="useActualColumnNames" value="false"/>
</table>
</context>
</generatorConfiguration>
|
修改好文件后,有两种方式
注意点
使用逆向工程时,最好新建一个工程,如果你在原来的工程中使用,那也可以,

但是有一定的风险,因为mybatis是根据配置文件中配置的路径来生成的文件的,

如果你工程中有相同名字的文件,那么就会被新生成的文件所覆盖。所以实际开发中,

我们一般新建一个工程,将生成的文件复制到自己的所需的工程中。
1
2
3
4
5
6
7
8
9
10
11
12
13
14
15
16
17
18
19
20
21
22
23
24
25
26
27
28
29
30
| package com.truly.test;
import org.mybatis.generator.api.MyBatisGenerator;
import org.mybatis.generator.config.Configuration;
import org.mybatis.generator.config.xml.ConfigurationParser;
import org.mybatis.generator.internal.DefaultShellCallback;
import java.io.File;
import java.util.ArrayList;
import java.util.List;
public class GeneratorTest {
public void testGenerator() throws Exception {
List<String> warnings = new ArrayList<>();
boolean overwrite = true;
//指定逆向工程配置文件
File configFile = new File(GeneratorTest.class.getResource("/generatorConfig.xml").getFile());
ConfigurationParser cp = new ConfigurationParser(warnings);
Configuration config = cp.parseConfiguration(configFile);
DefaultShellCallback callback = new DefaultShellCallback(overwrite);
MyBatisGenerator myBatisGenerator = new MyBatisGenerator(config,callback,warnings);
myBatisGenerator.generate(null);
}
public static void main(String[] args) throws Exception {
GeneratorTest generator = new GeneratorTest();
generator.testGenerator();
}
}
|
1
2
3
4
5
6
7
8
9
10
11
12
13
14
15
16
17
18
19
20
21
22
23
24
25
26
27
28
29
30
31
32
33
| <build>
<plugins>
<!-- 自动生成mybatis配置文件 -->
<plugin>
<groupId>org.mybatis.generator</groupId>
<artifactId>mybatis-generator-maven-plugin</artifactId>
<version>1.3.2</version>
<dependencies>
<dependency>
<groupId>mysql</groupId>
<artifactId>mysql-connector-java</artifactId>
<version>${mysql.version}</version>
</dependency>
<dependency>
<groupId>org.slf4j</groupId>
<artifactId>log4j-over-slf4j</artifactId>
<version>1.7.25</version>
<exclusions>
<exclusion>
<groupId>org.slf4j</groupId>
<artifactId>slf4j-api</artifactId>
</exclusion>
</exclusions>
</dependency>
</dependencies>
<configuration>
<verbose>true</verbose>
<overwrite>true</overwrite>
</configuration>
</plugin>
</plugins>
</build>
|
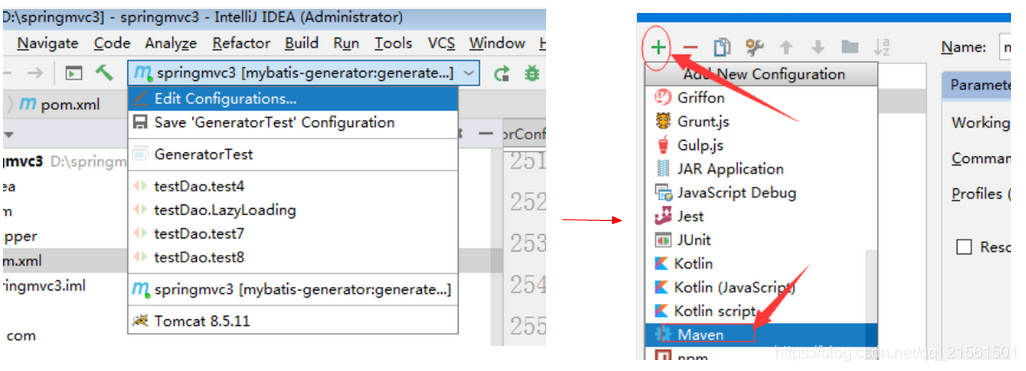
点击菜单run中Configurations(图)
点击加号,并选择maven(图)
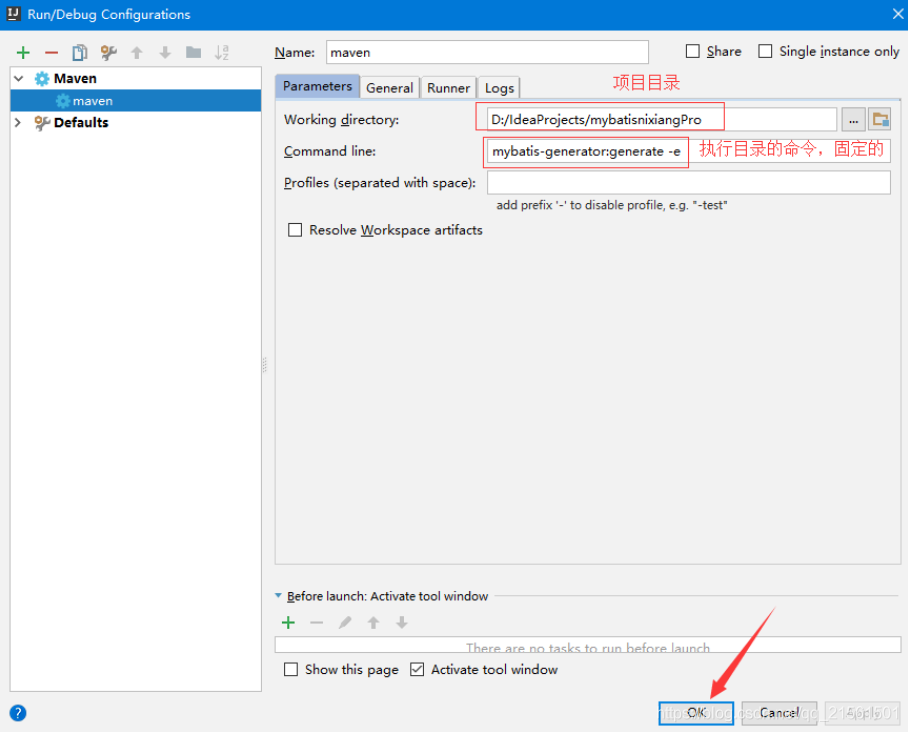
在name和Commond line分别填上如上图所示,apply和ok(图)
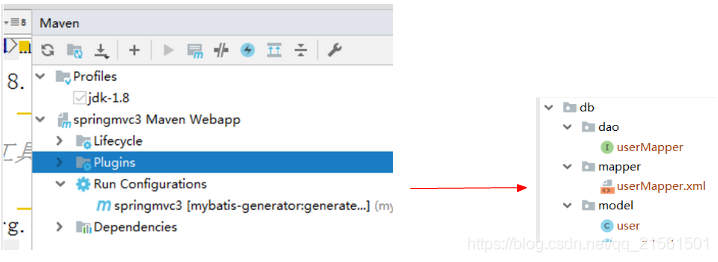
点击如下运行(图)
生成示例(图)
1.1.4 mybatis缓存
须知
缓存

    1.存在内存中的临时数据

    2.将用户经常查询的数据放在缓存(内存)中,用户去查询数据就不用从磁盘上(关系型数据库数据文件)

      查询,从缓存中查询,从而提高查询效率,解决了高并发系统的性能问题

优点

    减少和数据库的交互次数,减少系统开销,提高系统效率

使用前提

    经常查询并且不经常改变的数据
mybatis缓存
mybatis包含一个非常强大的查询缓存特性,它可以非常方便地定制和配置缓存。缓存可以极大的提升查询效率。
mybatis系统中默认定义了两级缓存:一级缓存和二级缓存。
为了提高扩展性,Mybatis定义了缓存接口Cache。操作者可以通过实现Cache接口来自定义二级缓存
一级缓存
- 含义
- 一级缓存也叫本地缓存(session级别的缓存)
- 与数据库同一次会话期间查询到的数据会放在本地缓存中
- 以后如果需要获取相同的数据,直接从换缓存中拿,没必须再去查询数据库
二级缓存
- 含义
- 二级缓存是基于基于namespace级别的缓存
- 多个Sqlsession去操作同一个mapper的sql时,不论Sqlsession是否相同,只要namespace相同就能共享数据。